
![]()
The embroidery on the dress doesn’t look great. There, I said it. I’m not pleased with it but there is absolutely nothing I can do but go forward with it, as time consuming and amateur-looking as it is. Ah well, cest la vie I suppose. Good thing it’s only a costume. I’ll update with pictures when I get back to working on it.
For now I have a new obsession, and that is sewing for Days for Girls! Days for Girls is an awesome charity that makes reusable feminine hygiene kits that wash with very little water and don’t necessarily look like what they are for girls in places like Africa where they are forced to use whatever they can find to deal with their periods, be it rags or even dung. Yes, dung. Don’t ask me how, but no girl should have to do that. Ever.
Because of this problem, these girls miss up to 5 days of school a month, which is a lot! Staying in school is absolutely critical to breaking the cycle of poverty. Not only do the kits from Days for Girls provide them a way to stay in school those lost 5 days, but the organization provides education on the monthly cycle and how to properly care for the body. In some cases, this is literally life saving.
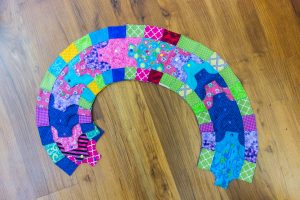
The kits include a lot of things, but what I’ve been sewing are called shields. They are the part that snaps around the undies and holds the absorbent pad parts (up to 3 of them for those heavy days) in place. Since the components of the kits are sewn by various people working with their own cloth, none of them will match and thus the policy is that the shields don’t necessarily come in all one colour. There are lots of restrictions on the print the cloth must have, but the gist is that it can’t have faces, must be bright “stain-busting” colours, and must be made of quality woven cotton, such as what you would find for quilting. There is also 1 layer of PUL (polyurethane laminate) – a knit cotton with a very thin layer of plastic on one side – in the middle to act as a moisture barrier.
So far I’ve made I think 29 0r 30 of these guys, 2 of which I’ve donated and 2 of which I rejected (one because it was missing a critical stitch and the other because it came out too small). The sizing is very very strict, so each one is 9.5 inches tall and 7.75 inches wide. The snaps are plastic, from a company called KAMsnaps. They are put on with a special hand or desk press (I have the hand press). Each kit is designed to last the girl up to 4 years, with 3 being what is promised.
Until next time! xoxo
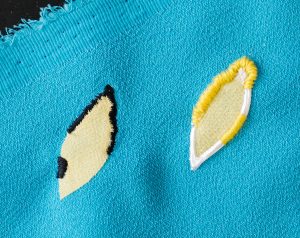
Last night after I posted my progress I felt like I should experiment with embroidery since I knew I’d be doing a TON of it on this dress. The first thing I tried was machine embroidering the edge of a yellow petal (with black thread because it was already in my machine and I was too lazy to switch to yellow). It worked but looked awful. It was squiggly and just generally really amateur looking.
Next I tried embroidering over the puffy paint with embroidery thread, which also didn’t work. It was way too chunky and squiggly and gross looking, but it was better. I think.
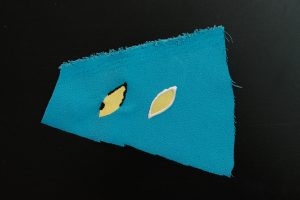
This morning I had the brilliant idea of using just one thread of the embroidery floss with a regular needle rather than a tapestry needle, and it worked! Man does it take forever, but it looks beautiful! The result is the lower right of the right petal.
Because it takes so long though I have decided to use this method only on the tiny pieces of the bodice, which I appliqued this morning as well. I also added puffy paint to one quarter of it so it could get drying (it takes 4 hours before I can begin embroidering over it – yikes!). Next up after all that will be adding rhinestones to make it sparkle!
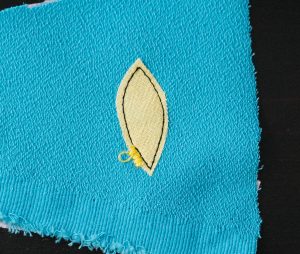
For the petals on the sunflowers of the skirt I think I will just outline them with thread. Hand embroidering those things would take a lifetime. Here is my test of such a method. The yellow bit was my attempt at full embroidery floss without puffy paint, which went nowhere quick.
I bought the heavy duty HeatnBond paper for the skirt since I won’t be actually embroidering it. The lite version is meant for it to be stitched on. I will work on those as I wait another 2 hours for the paint to dry, then it’s gonna be embroidery central in here!
Until next time! xoxo
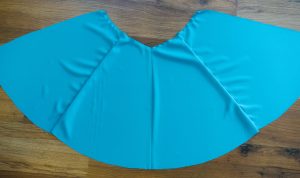
After the bodice was all pinned up it was time to add the skirt. I bought 1.5 meters of “Lila” crepe in a nice bright teal colour for $24/m -70%, so it came out to $10.80. The inside is nicely textured with the outside being ultra textured. It gives the skirt a nice flowyness as well as a lot of character when you look at it up close.
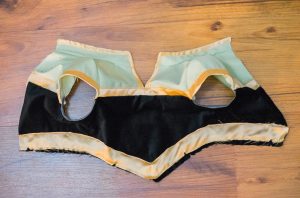
Yesterday I was worried that the black overhanging the gold fabric would be a problem, and it turns out it was. A huge problem. Not only did it make the band in the front lopsided and puckered…
…but the back was horrible when I put in the zipper!
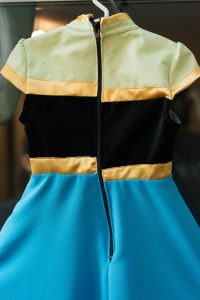
Talk about fugly! At least this part will be covered with the vest. And maybe the appliques, which I am currently experimenting with right now, will distract from the imperfections up top.
For the appliques I bought a package of HeatnBond Lite. I stuck two petals of the sunflowers that will eventually adorn the bottom of the skirt to a swatch of the teal fabric and lo and behold it stuck perfectly! I was pretty happy about that.
Angel Lea Designs has a wonderful tutorial on how to properly do appliques, and I figured I’d try her method of machine sewing them on around the edges. It didn’t turn out well, so I am going to attempt a “cosplay hack” I found on Pinterest (which was taken from Tumblr which was taken from Facebook) that involves puffy paint. Basically you do up and stick on the applique, then rim it in puffy paint. Once that dries you hand-embroider over it with embroidery thread to create a three dimensional applique…or at least the edges. We’ll see how it turns out. I’m currently waiting for the white puffy paint to dry, but I think since I have a little extra room on the prepared applique I might try hand-embroidering without the puffy paint just to see how it goes.
That’s it for now. Until next time! xoxo
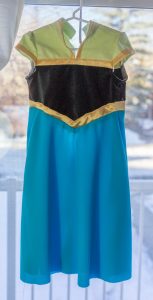
A while ago I decided to make some princess dresses for Hana and her little friends for when they’re old enough to play dress up, and I actually started Merida’s green dress when I was pregnant and then a shimmery blue, lacy number a few weeks ago, but after my discovery of PatternLab I was inspired to make my own dress. I chose Anna’s coronation dress from Frozen, but then I realized I shouldn’t be making myself costumes I’ll never get to wear and instead should be concentrating on someone who will wear what I make, so I grabbed my handy dandy Simplicity 1097 pattern, ran to the fabric store, and got started on Anna’s Frozen Fever dress!
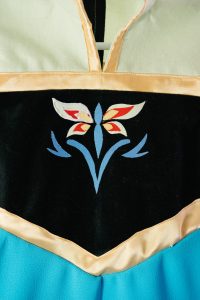
I decided a little too late to start a blog so I don’t have progress pictures of the beginning stages. I started taking pictures when the bodice and yolk had been sewn up and sewn together.
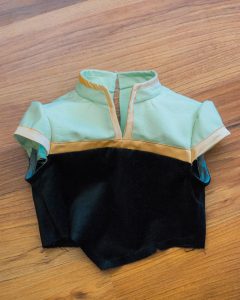
In the short, Anna’s undershirt/yolk is much more yellow than the mint green I used here, but the black velveteen was $24 a meter and I already had so many other colours to buy that I decided to just use what I could find from the sale rack. It is a nice cotton fabric with a textured outside and soft inside for comfortable wear. The gold is a nice silky texture but a nightmare to work with because I had to fold it down ever so slightly and sew along the edge but the dang fabric melted under my iron!
Which led to a ton of pinning.
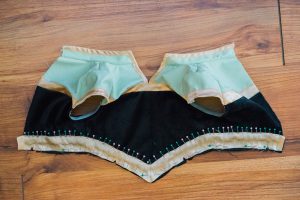
As you can see, the gold doesn’t match up well to the black. This is because the gold fabric decided it was too good to be cut properly and slid all over the place, despite using pins generously. And when it was sewn up it got even worse.
Not only did the black and gold not line up, but neither did the point. I’m hoping I sew the bodice to the skirt at 5/8″ because that will cover the excess black but if not I may be forced to trim it, making it uneven.
Now I’m off to cut the skirt, something I’ve been dreading doing because it’s so big and I really hate cutting out huge pieces of fabric. Wish me luck!
Until next time!
Welcome to Sew Dandy!
I decided to start blogging my creations because I tell people that I sew and they ask what I’m making so now not only can I show them the final product, but they can see the process I went through to get it done. I find this kind of thing fascinating to read about (check out Angela Clayton’s blog for some really crazy stuff!) and I figured you might too!
My first bloggable (is that a word?) project is Anna’s dress from Frozen Fever! I’m thinking I’ll make a matching Elsa dress next, but I have a long way to go on my current one first.
I’ll attempt to update this blog regularly, but for now there isn’t much as it is brand new. But do enjoy what there is and check back often!